Hello everyone. Today we will have a closer look at how to control the access to our network switches for operational purpose by using Cisco ISE and Active Directory.
We will assume that your Windows Server with AD services is already configured and fully functional.
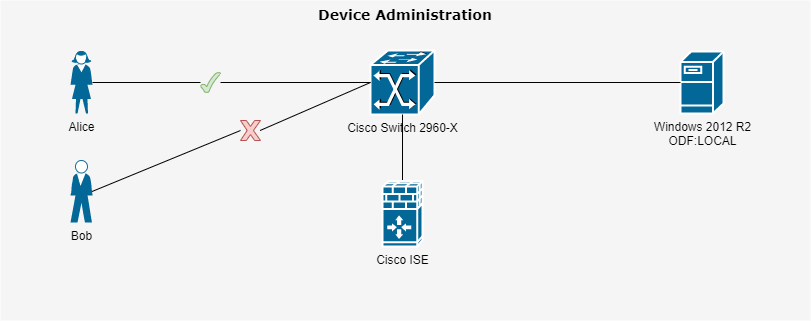
For our short example we will use a very small topology where the Cisco ISE and the Windows Server with Active directory services are located in the same subnet. It is true that for such a small IT-enviroment you could manage the credentials directly on the switch or on your ISE, but the example should demonstrate how we can deal with a big enterprise where there should be a certain level of transparency and security in the enviroment, avoiding unauthorized access to our infrastructure.
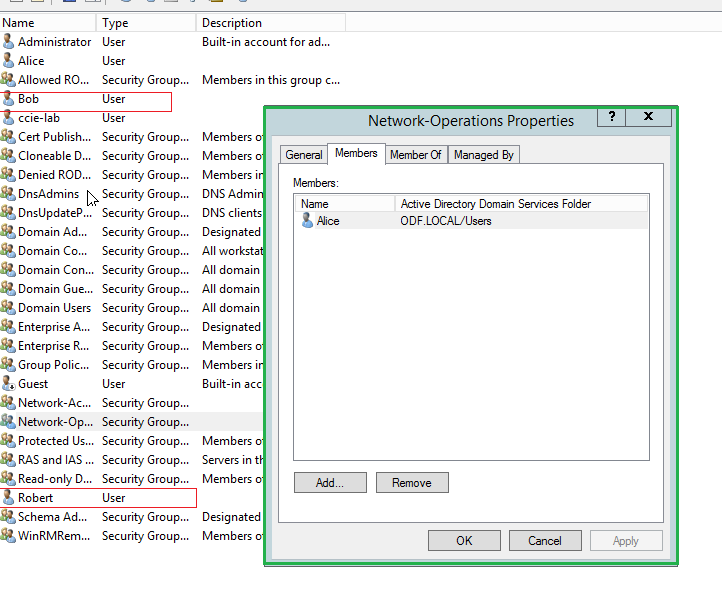
Within the AD we have placed three users in different security groups. Alice (IT), Bob (HR) and Robert (Marketing). Alice as an IT employee should be the only one entitled to access the switch.
Therefore we will create a policy-set on the ISE to grant acces to the switches only to people within the security group „Network-Operations“.
Let’s have a look at the topology…
Configuration – Active Directory
As mentioned before, three users had been created, but only one (Alice) should have access to the switch, therefore I add her to the security group „Network-Operations“.
Configuration – Cisco ISE
First of all we will join the ISE to our Domain.
We have to make sure that the name-server configured on our ISE installation is pointing to the Windows Server. You can configure it on the CLI by using the following command.
no ip name-server 192.168.1.1 (The IP of your current DNS)
ip name-server 192.168.1.10
After you issued the first command, the system will ask you to restart the services in order to apply the configuration correctly. We will answer with NO and after we execute the second CLI command. Then we should restart the services when prompted.
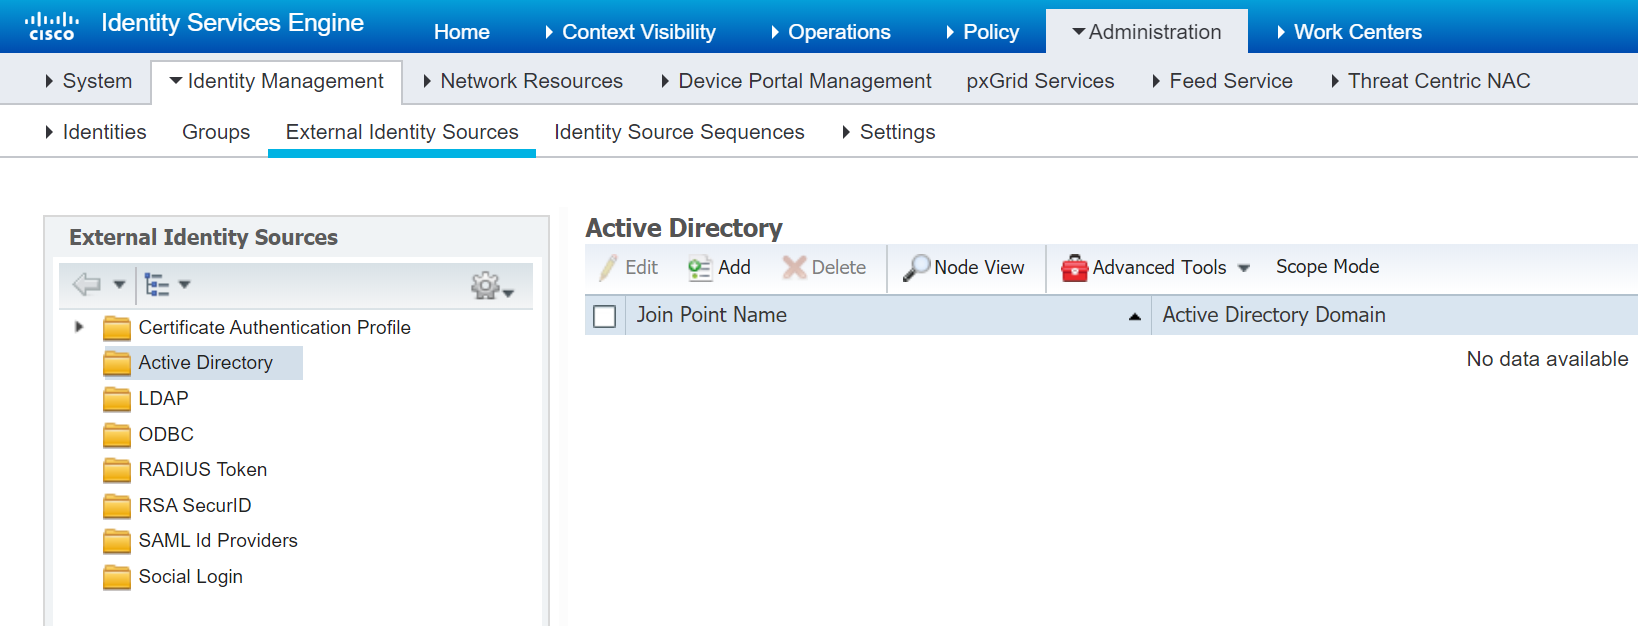
Under the menu „Administration -> Identity Management -> External Identity Sources -> Active Directory“ we will click on the button „Add“.
In order to join the domain we will need a user with the proper rights to add a machine to the domain. In our case it will be the „administrator“.
After we add the address (FQDN) we will see our domain listed under the table below. Now you can select it and click on „join“.
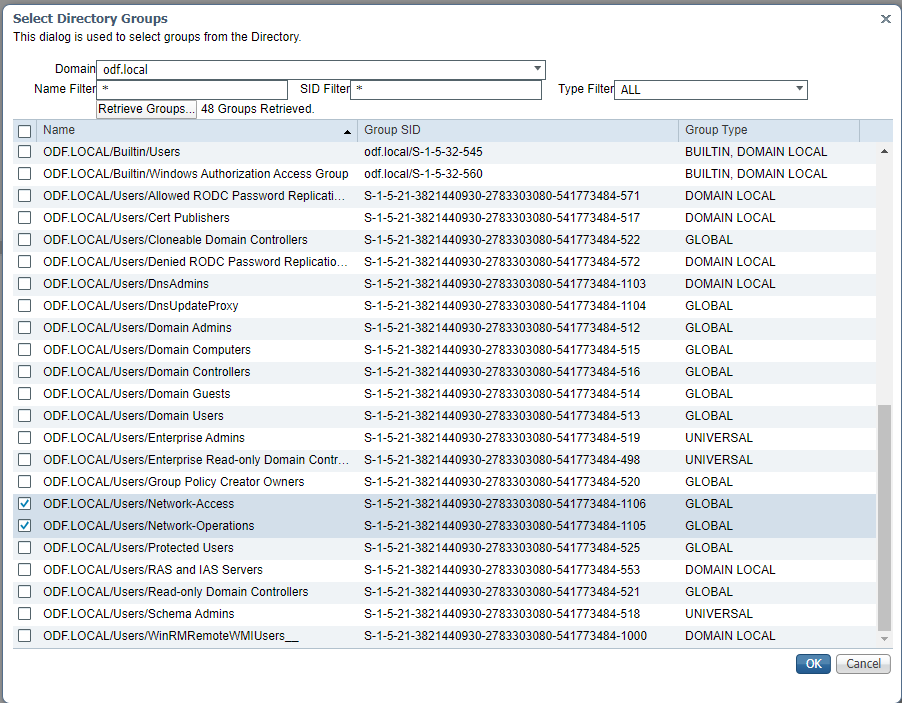
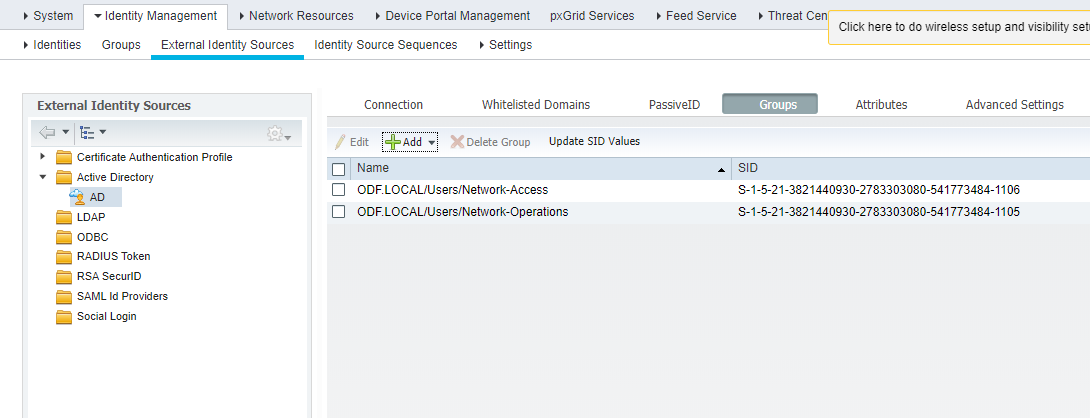
Once we joined the domain, we will need to import the groups we want to use in our setup. To accomplish this task we will click on the domain name and then navigate to the tab named „Groups“. By clicking on „Add“ a window will be shown. We can use the apporpiate filter to display only the groups that we want or just click on „Retrieve Groups“ in order to show all the groups on the Windows Server.
As discussed earlier we will check „Network-Operations“ and then confirm with „OK“.
After we import the groups we need, the list should look similiar to the figure below.
Now we should create and authorization profile that will apply to the users who successfully passed the authentication.
We will name it „network_admin_cisco“ and be sure that the „Access Type“ is set to ACCESS_ACCEPT. We also need to create some additional advanced attributes to grant the porper privilege level to Alice once she is logged in.
„Cisco:cisco-av-pair“ containing the value „shell:priv-lvl=15“ for the highest privilege in the console.
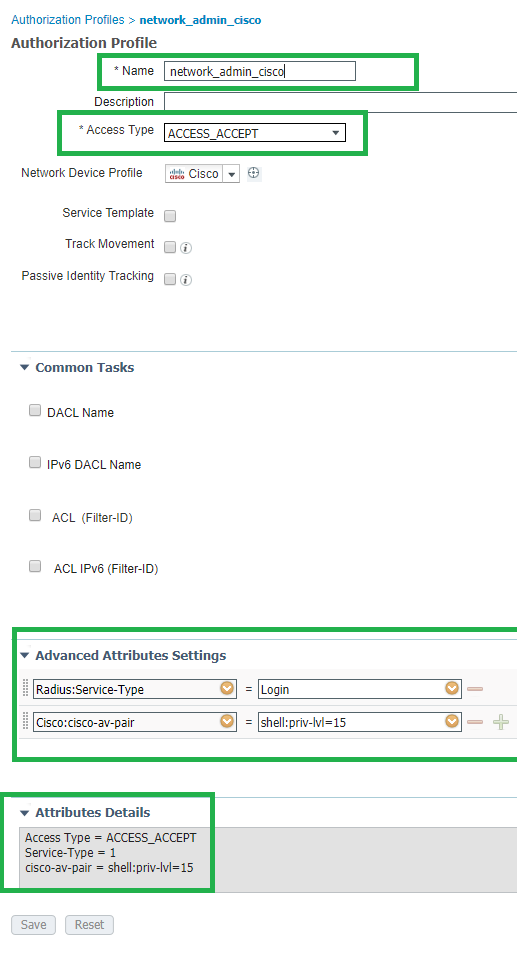
Once the profile is created we are able to create the policy-set without any issues.
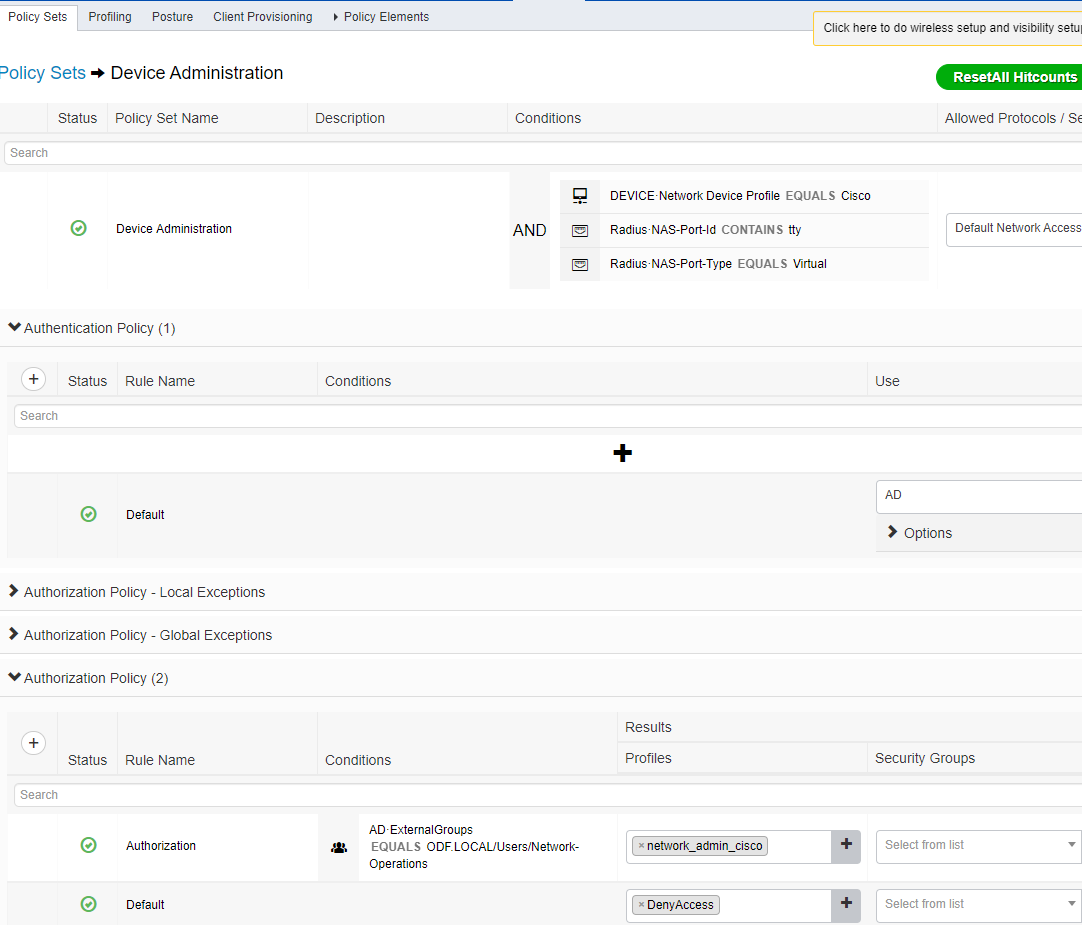
Policy-Set
Policy-Condition
DEVICE: Network Device Profile EQUALS Cisco
Radius NAS-Port-Id CONTAINS tty
Radius NAS-Port-Type EQUALS Virtual
Authentication Policy
Default: AD (Name von meinem External Identity Source)
Authorization Policy
AD ExternalGroups EQUALS ODF.LOCAL/Users/Network-Operations
Authorization profile: network_admin_cisco
The policy should look like this.
Configuration – Switch
The configuration on the switch is pretty short and easy.
In order to allow a certain granularity, I’ve created a method list called „VTY“. Since the list needs to be invoked within the VTY in order to be used, we will need also to also configure the following commands.
aaa new-model
!
!
aaa authentication login VTY group radius local
aaa authorization config-commands
aaa authorization exec VTY group radius local

line vty 0 4
authorization exec VTY
login authentication VTY
transport input ssh
Now the configuration is complete and we can test it.
Verfication
First we will try to access the switch with Alice’s user.
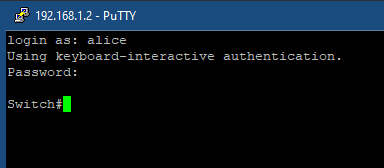
It seems to work! But lets have a closer look at what happened on the RADIUS authentication.
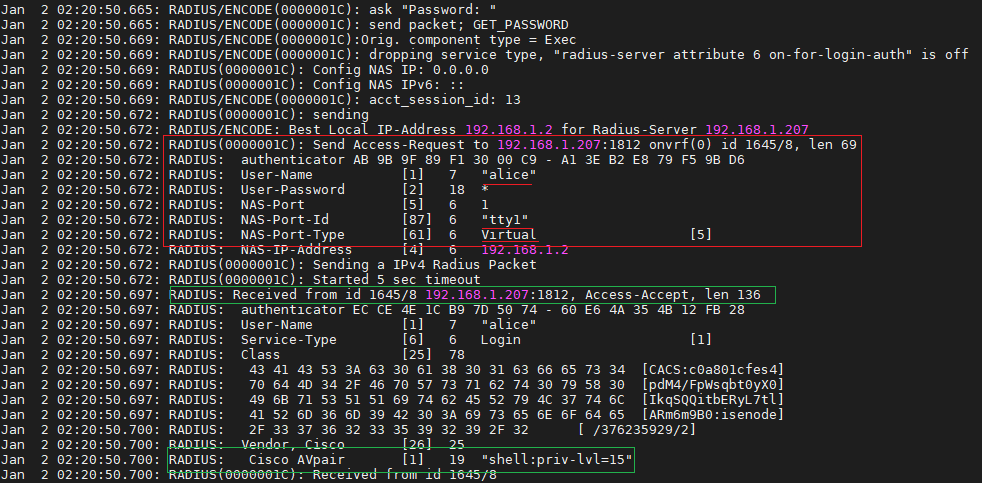
Everything we defined before within the policy-set can be observed in the Access-Request sent by the switch. Username alice, NAS-Port-Id contains the word „tty“ and the NAS-Port-Type is equal „Virtual“.
RADIUS(0000001C): Send Access-Request to 192.168.1.207:1812 onvrf(0) id 1645/8, len 69
RADIUS: authenticator AB 9B 9F 89 F1 30 00 C9 - A1 3E B2 E8 79 F5 9B D6
RADIUS: User-Name [1] 7 "alice"
RADIUS: User-Password [2] 18 *
RADIUS: NAS-Port [5] 6 1
RADIUS: NAS-Port-Id [87] 6 "tty1"
RADIUS: NAS-Port-Type [61] 6 Virtual [5]
Now we can see the „Access-Accept“ from the RADIUS Server confirming that the authentication has been passed successfully and we can also appreciate the additional information the ISE forwarded from the authorization profile defined (Cisco AVpair [1] 19 „shell:priv-lvl=15“)
RADIUS: Received from id 1645/8 192.168.1.207:1812, Access-Accept, len 136
RADIUS: authenticator EC CE 4E 1C B9 7D 50 74 - 60 E6 4A 35 4B 12 FB 28
RADIUS: User-Name [1] 7 "alice"
RADIUS: Service-Type [6] 6 Login [1]
RADIUS: Class [25] 78
RADIUS: 43 41 43 53 3A 63 30 61 38 30 31 63 66 65 73 34 [CACS:c0a801cfes4]
RADIUS: 70 64 4D 34 2F 46 70 57 73 71 62 74 30 79 58 30 [pdM4/FpWsqbt0yX0]
RADIUS: 49 6B 71 53 51 51 69 74 62 45 52 79 4C 37 74 6C [IkqSQQitbERyL7tl]
RADIUS: 41 52 6D 36 6D 39 42 30 3A 69 73 65 6E 6F 64 65 [ARm6m9B0:isenode]
RADIUS: 2F 33 37 36 32 33 35 39 32 39 2F 32 [ /376235929/2]
RADIUS: Vendor, Cisco [26] 25
RADIUS: Cisco AVpair [1] 19 "shell:priv-lvl=15"
RADIUS(0000001C): Received from id 1645/8
Everything is fine, but what happens if Bob tries to access the switch via SSH?
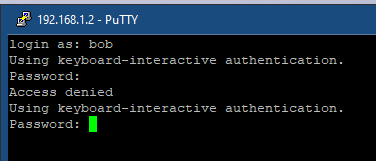
The output from PuTTY clearly tells us that the access to the switch has been denied. Lets take a closer look at the the answer from the RADIUS Server.
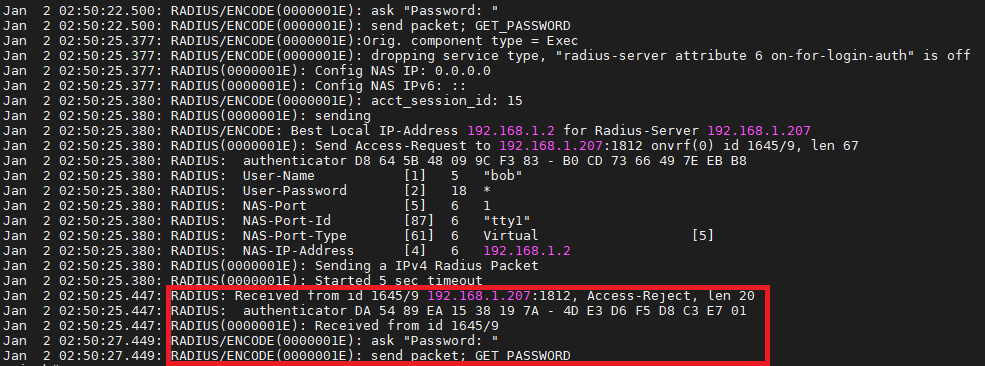
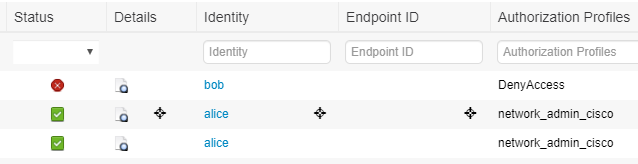
The server answered with an „Access-Reject“. On the ISE we can see that the authentication of Bob was okay, but when it came to the authorization the ISE couldn’t find him in the „Network-Operations“ group. Therefore, the only valid result for this action was to deny the access to the switch.
Conclusion
As mentioned earlier in this post, we can also manage the user and the access by the device itself or through ISE. You will also need to create multiple users as soon as someone arrives to your company and remove multiple users on multiple platforms once they leave. We will also avoid having the same user in our IT-enviroment having with several passwords. This is hard to remember and will lead to issues like users locked out, which means more work for your IT-Staff.
Choosing to manage the access to the switches through the Active Directory offers us the possibility to have all our users centrally managed.
Sunny greetings!

Thanks so much for this ||
LikeLike