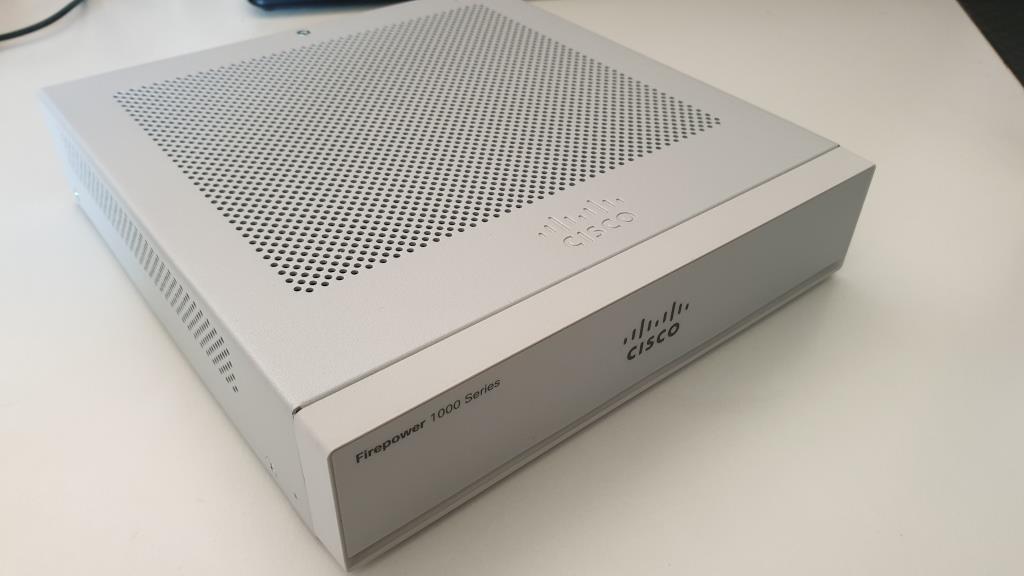
Hello everyone. Today we have the honor to be the witness of the unboxing of my new Cisco Firepower 1010. I have big expectations and I will spend some time to cover all the needed basic information about this device.
At the time I am writing this post there is already a newer version of the software released (6.6). The devices are being delivered with version 6.4 and this will be the version we will see in this post. Once I’ve played around, the device will be upgraded and for sure a new post will be written regarding the new features.
Unboxing
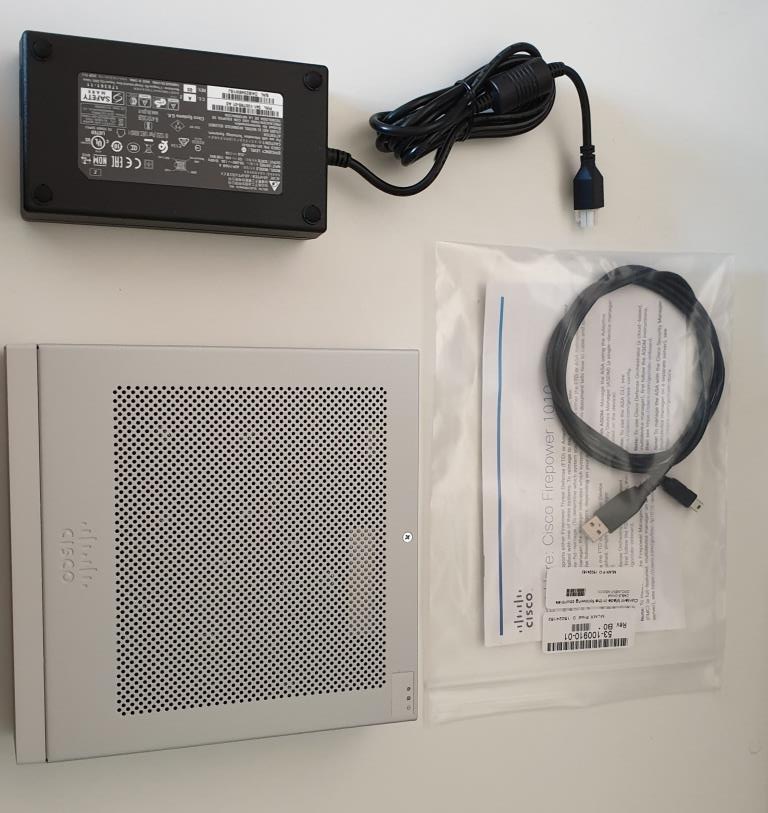
Not much to say about it. This is the content of the box. In this case I got the power supply that allows me to run PoE on the Firepower.
The Box
The dimensions of the box itself are very similar to the 5506-X. Here a comparison.
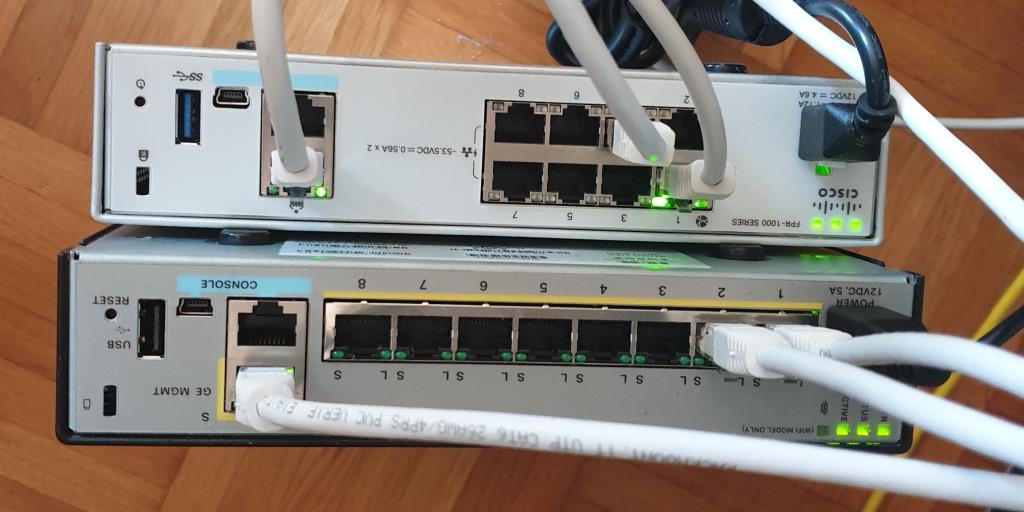
Back 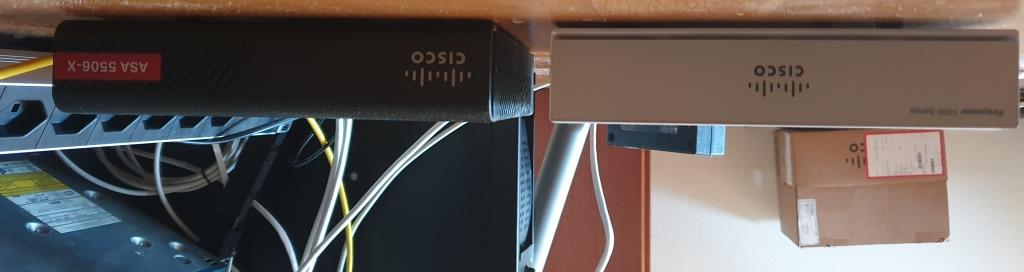
Front 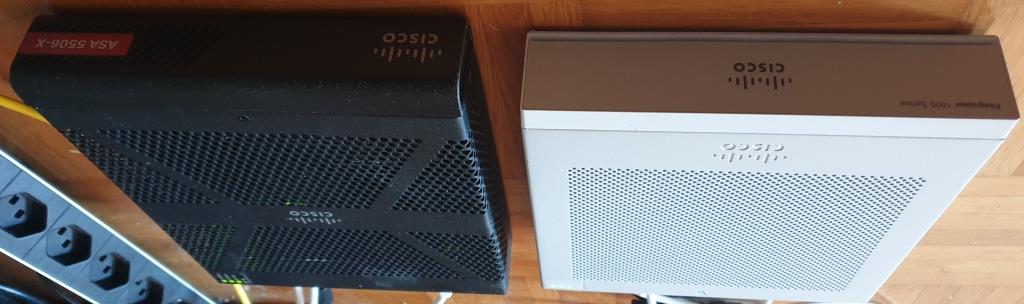
Front 
The device does not have a fan, it is fanless therefore very quiet.
The software running on the box is 6.4.0-102.
The Front of the Firepower 1010

There are no leds in the front of the device.
The Back of the Firepower 1010

As mentioned earlier this firewall is compared to the ASA-5506-X a bit taller. ASA had only one row with ports, the Firepower has two.
Connections
- 8 x Gbit ports
- 1 x Management port
- 2 x Console port (USB Mini B and RJ-45)
- USB-Port type A
In case you have the big power supply, you will be able to run PoE in port seven and eight.
The device is equipped with two console ports (RJ-45 and USB Mini B). Only one of them can be active at a time. If you want to connect through the USB console port and you run Windows, you will need to install the drivers from software.cisco.com, Mac OS X, and Linux should not have any issues.
If you want to use the USB Slot type A in order to copy some files or firmware, you will need to be sure that the external drive is formatted as FAT-32. Otherwise, the device won’t be recognized.
Rack- Wall-mount kit
If you want to mount your Firepower into a rack or on the wall, you will need on of these Cisco part number.
| 69-100648-01 | Cisco Firepower 1010 rack-mount kit (spare) |
| 69-100647-01 | Cisco Firepower 1010 wall-mount kit (spare) |
Hardware
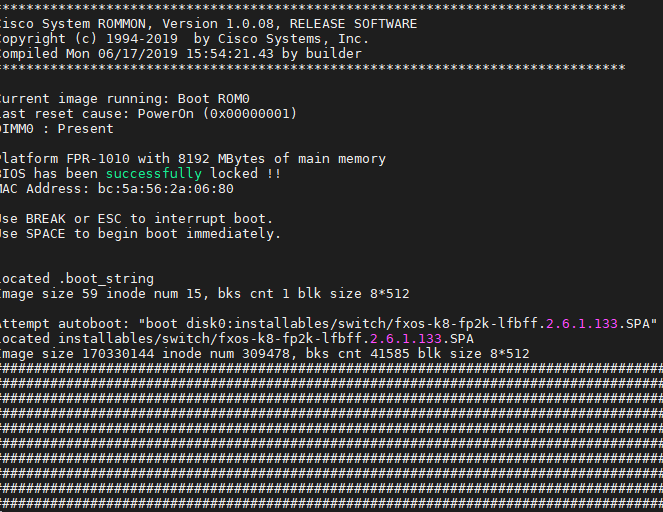
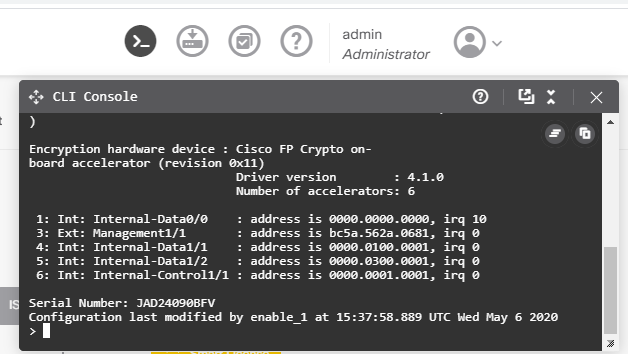
This is the output given by the console.
Hardware: FPR-1010, 2937 MB RAM, CPU Atom C3000 series 2200 MHz, 1 CPU (4 cores)
Encryption hardware.
Encryption hardware device :
Cisco FP Crypto onboard accelerator (revision 0x11)
      Driver version        : 4.1.0
      Number of accelerators: 6
Initial setup
I will turn on the box while having a look on the console.
These are the settings for the console port
- 9600 baud
- 8 data bits
- no parity
- 1 stop bit
- no flow control
There we go…

While booting…
The initial setup
You must accept the EULA to continue.
Press to display the EULA:
End User License Agreement
[…]

Please enter 'YES' or press to AGREE to the EULA:

System initialization in progress. Please stand by. You must change the password for 'admin' to continue.
Enter new password: ***
Confirm new password: ***
You must configure the network to continue.
You must configure at least one of IPv4 or IPv6.
Do you want to configure IPv4? (y/n) [y]:
Do you want to configure IPv6? (y/n) [n]:
Configure IPv4 via DHCP or manually? (dhcp/manual) [manual]:
Enter an IPv4 address for the management interface [192.168.45.45]:
Enter an IPv4 netmask for the management interface [255.255.255.0]:
Enter the IPv4 default gateway for the management interface [data-interfaces]: 192.168.1.1
Enter a fully qualified hostname for this system [firepower]:
Enter a comma-separated list of DNS servers or 'none' [208.67.222.222,208.67.220.220]:
Enter a comma-separated list of search domains or 'none' []:

If your networking information has changed, you will need to reconnect.
DHCP Server Disabled
The DHCP server has been disabled. You may re-enable with configure network ipv4 dhcp-server-enable For HTTP Proxy configuration, run 'configure network http-proxy'

Manage the device locally? (yes/no) [yes]: yes
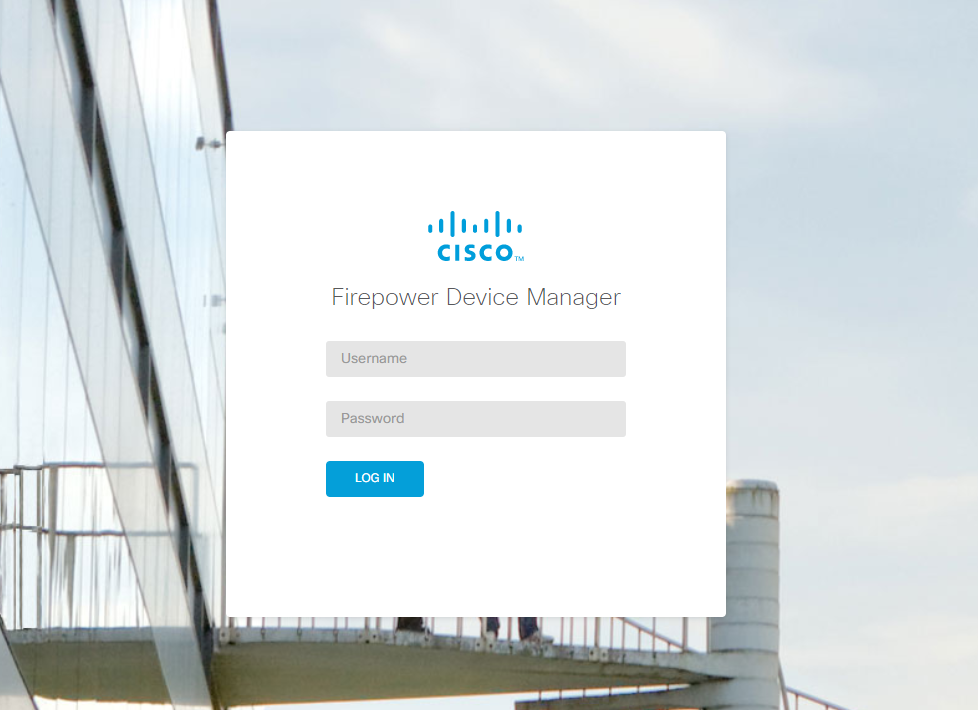
Firepower Device Manager (FDM)
The Firepower can be managed by the local manager (FDM) or can be added to a Firepower Management Center (FMC) instance. Today we will see how the local manager works.
Connecting an ethernet cable in the Management port will provide us an IP-Address within 192.168.45.0/24 range. This will allows us to contact the Firepower via browser or SSH.
At this point, we also need to know that FDM does NOT support to set up your Firepower into transparent mode. Therefore it can only be used with routed mode.
>configure manager local
Local manager does not support transparent firewall mode.
In order to configure your firewall as a transparent device in your environment, you will need to run the Firepower Management Center (FMC). Keep in mind, that running FMC on VM will require a minimum of 28 GB RAM (32 recommended). You will be able to install it with less, but services will keep crashing.
In case you already work or saw a Cisco environment where a Firepower and FMC was in place, you will realize that you will be very limited regarding the features you will be provided with.
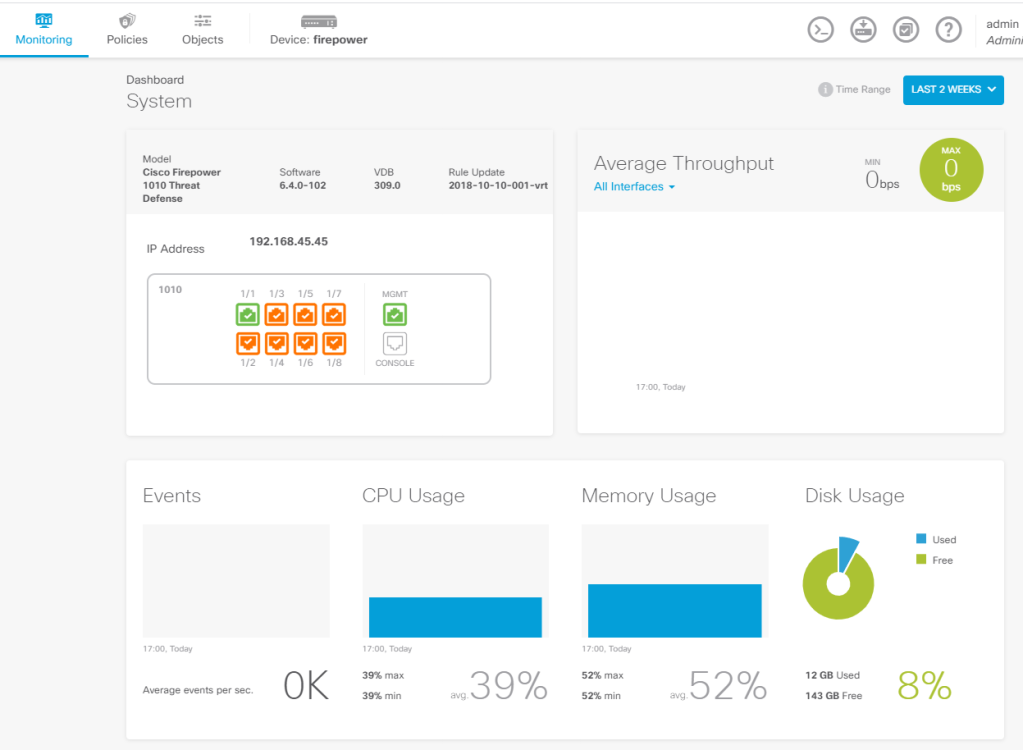
The dashboard
We can reach the dashboard by opening a browser and enter the URL https://192.168.45.45. Later, when the login mask appears, we can just login using the credentials we created during the setup.
Once the authentication was successful we will have access to several menus and information. At first sight it might look a bit overcrowded. This is something we need to getting used to.
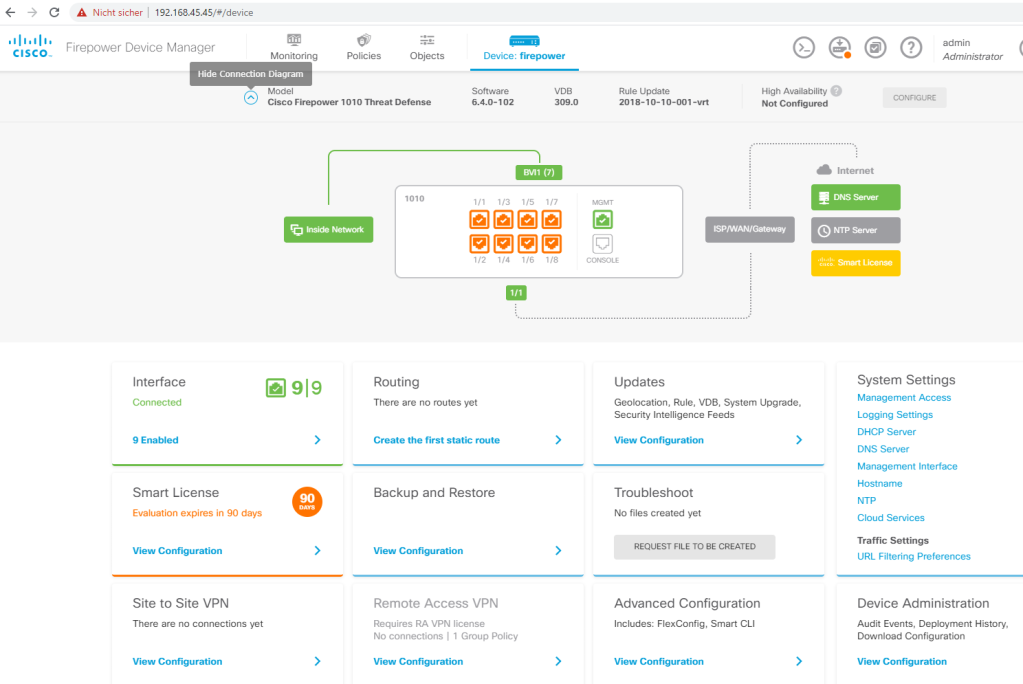
The dashboard also offers a command-line interface. You can execute all the commands you would be able to execute on the console, but the question mark ‚?‘ does not work. Instead of this, you must press TAB as on a Linux system.
Managing interfaces
By clicking on the dashboard on the Interfaces we will land on the overview of the ‚data‘ interfaces. The management interface is being managed on another section on the dashboard.
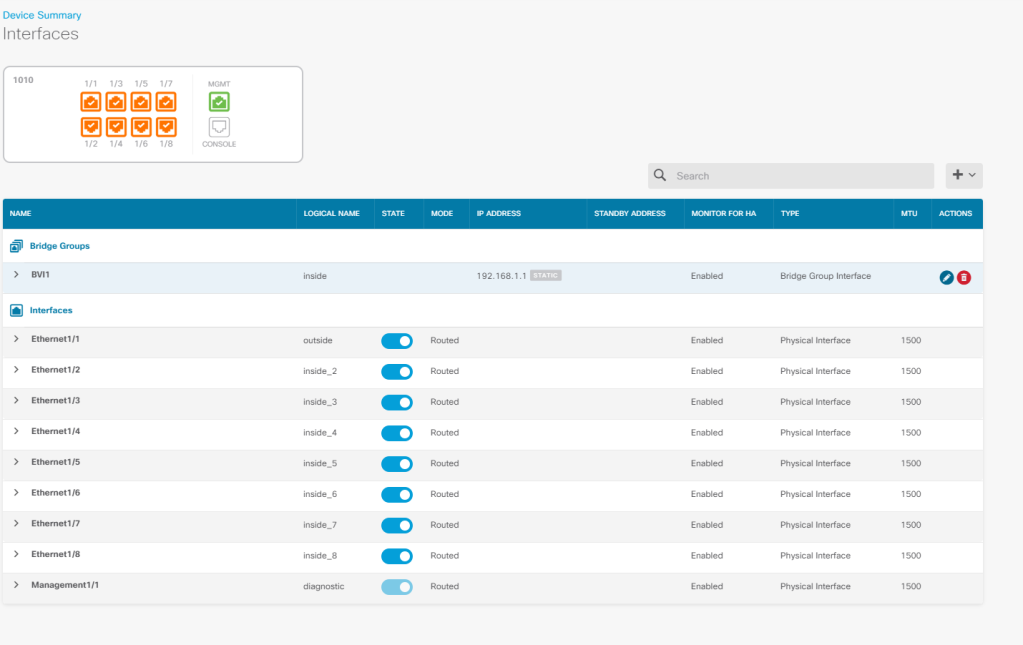
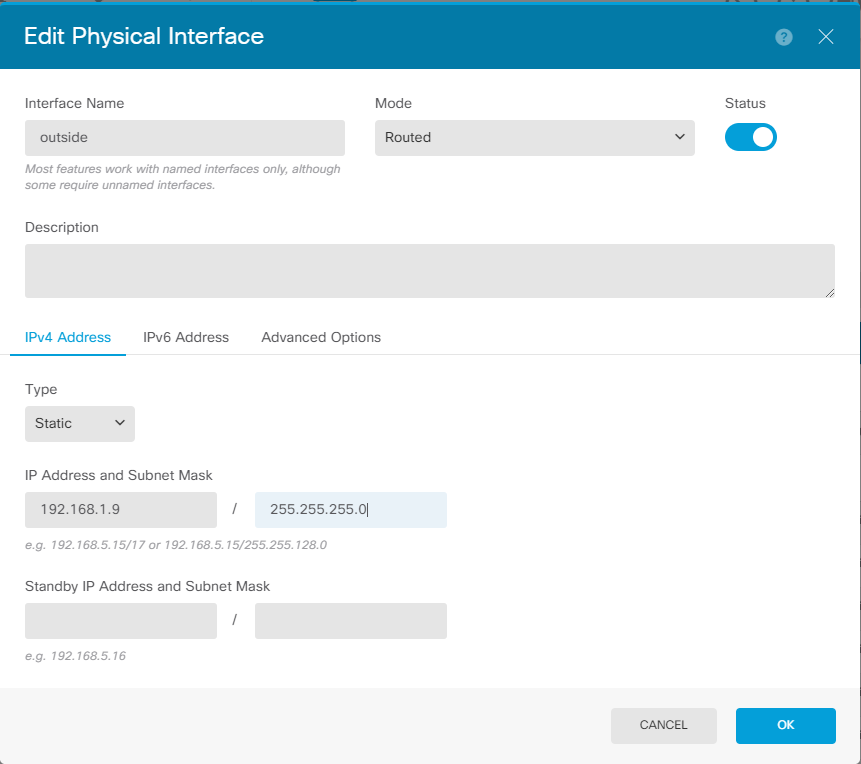
We can click on the right side on the ‚edit‘ button and change the settings of the interface. In this case, the IP-Address of the inside interface overlaps with the LAN-Network at home, therefore it needs to be changed.

We will also assign a static IP-Address to the outside interface.
After configuring the interfaces we will see the new IP-Addresses in the dashboard.

In order to reach the internet, we will also need a default route pointing to a device with internet access.

Once we configured both we will realize it does not work! Yes, correctly! We need to deploy the changes made.
Deployment
Once we make a change within the device the deployment icon will change and a kind of notification sign will appear.

Clicking on it would allow us to see the pending changes for this instance.
In this dialog box we have the following options.
- Deploy now: The job will be started and the configuration will be deployed on the Firepower.
- More actions -> Copy to clipboard: The pending changes will be copied to the clipboard.
- More actions -> Download as a text: We will be able to have a text file including all the changes made.
- More actions -> Discard all: All the changes made, will be reverted.
- Cancel: This won’t revert the changes we made, it will just close the current dialog box for later deployment.
This is a snapshot of how it looks like before deployment.

Once we click on deploy a message will inform us that our deployment is on going.
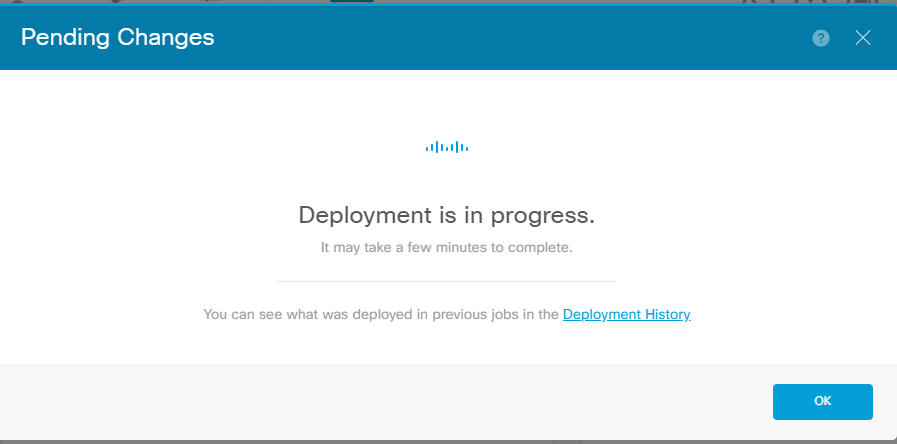
We can click on the task list to see the progress of all the task in this Firepower instance.

Don’t be scared if the deployment takes some minutes. Normally they can take between 2 and 7 minutes.
You will be able to see at any time when a deployment is pending, but you won’t see, once you deploy, to see when the task finished, there is no sign/icon for that purpose.
Shutting down and rebooting the device
In contrast to other devices, the Firepower does not an external power switch to turn the device on and off. You can power off the devices by executing the command shutdown or restart within the CLI.
Policies
By clicking on the menu Policies we will be able to see all the available options we have.
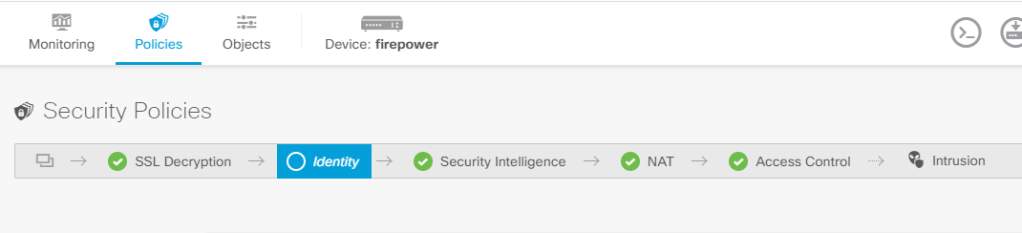
For our first deployment we will only need to create NAT- and Access Control rules.
Further policies are:
- SSL-Decryption: Here we will have the possibility to decrypt SSL-Traffic to have a better look inside the traffic is passing by through the device. If you configured a ‚File Policy‘ within an ‚Access Control‘ rule, you won’t have the visibility you need without SSL-Inspection.
- Identity: Here we can manage how users can be authenticated in order to allow. Firepower has the possibility to use a local DB or integrate a Cisco ISE instance.
- Security Intelligence: We can take decisions to block unwanted traffic before this arrives for further inspection. Sad is, you cannot block use Geo-blocking at this point.
- Intrusion Policy: If you enable it, you will have the choice between different predefined profiles in order to set up a suitable security level for your environment.
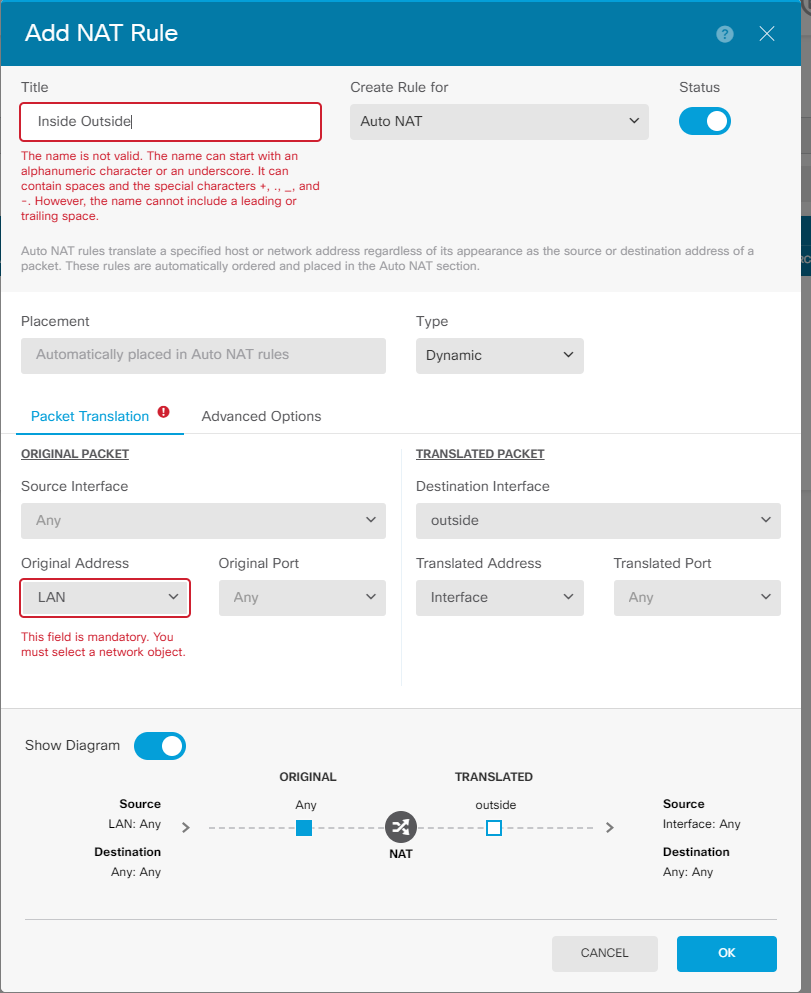
NAT – Connecting with the outside
Before we create our access rule to allow the traffic, we will masquerade the traffic behind the firewall.
Whenever we work with Firepower we will need to use objects to refer in policies. You will always have the possibility to create a new object within the wizard.
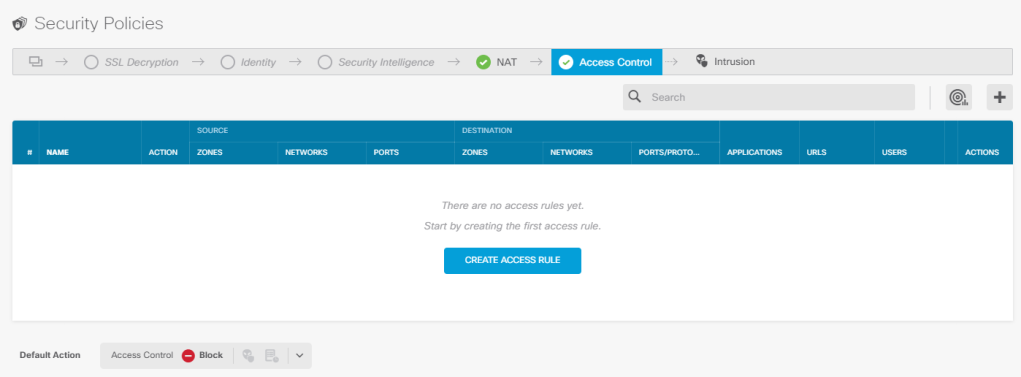
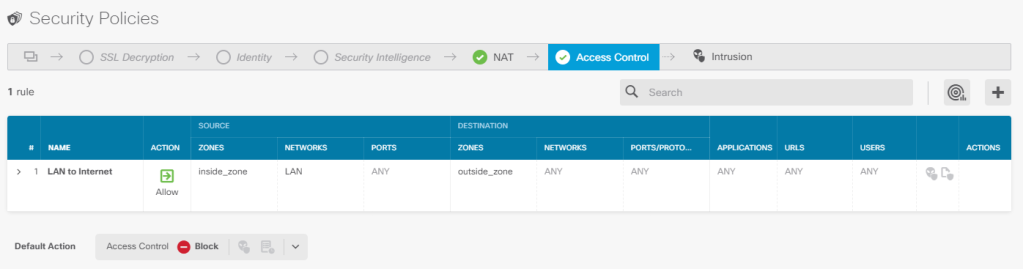
The first policy
Now our NAT-Rule is created… however traffic is not passing by. The Firepower has no pre-configured ACLs. We will need to define ourselves. As mentioned earlier we will need to create objects to refer later in policies.
By clicking on ‚create access rule‘ we willbe able to configure our policy more detailed.
Like we had on ASA, we will have the possibility to show a diagram on the bottom of the rule, to see what we are allowing or blocking.
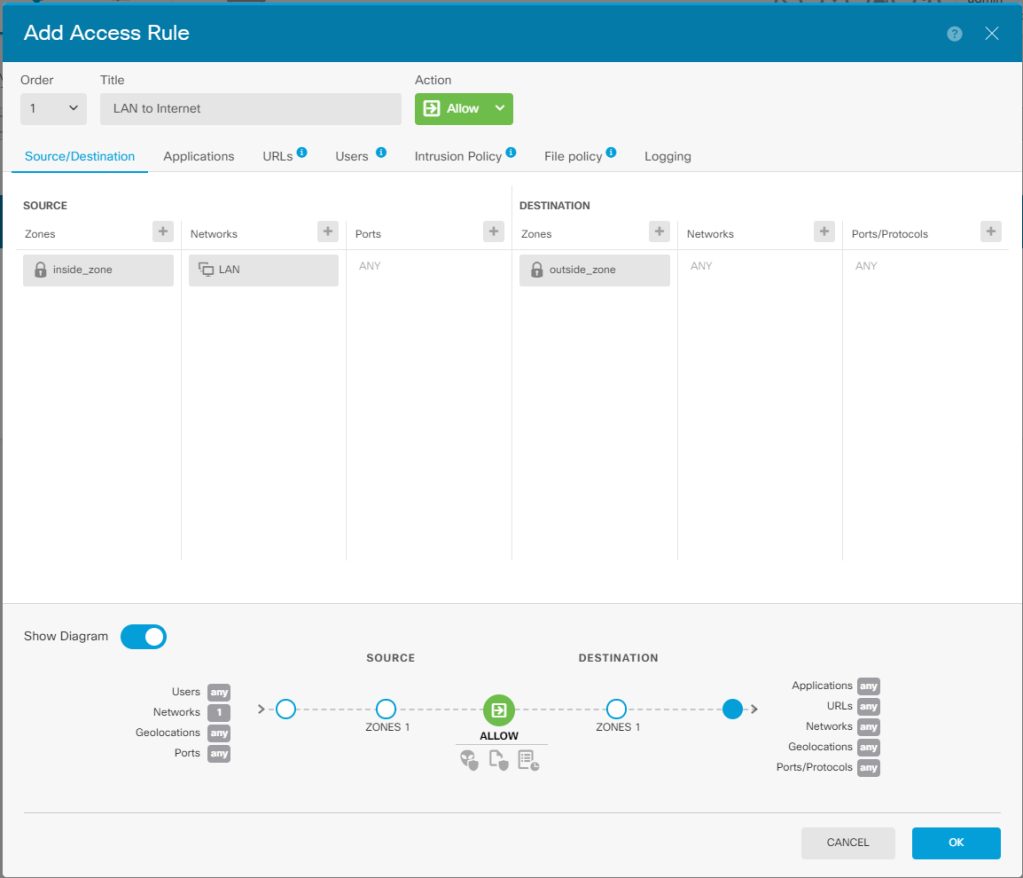
Regarding the actions
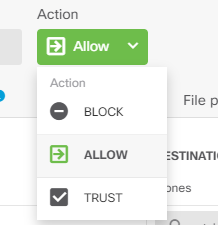
- Allow: Traffic will be allowed to pass, but traffic will be checked by further engines.
- Trust: When we choose to trust this type of traffic, we will see directly on the diagram that some options have been greyed out. This means, the traffic is trusted and there is no need for deeper checks. This will/could save time for critical applications.
- Block: Packet will be dropped.
This is the way we can create an access rule, but we also see more register with further conditions to match our traffic. These are some of the additional settings we can configure.
- Applications: You can block specific applications. This is useful when the service you want to block use, not the default port you configured. Also if the application uses dynamic ports.
- URL: If any of the conditions that are defined in this section are met, then the session will be blocked.
- Users: You can only allow access to this rule to specific successfully authenticated users.
- Intrusion Policy: you will have the choice between different predefined profiles in order to set up a suitable security level for your environment. Only based on pre-defined profiles.
- File Policy: You can choose which policy profile you want to apply to this rule. There is no option you can choose a specific file type to be blocked. Only based on pre-defined profiles.
- Logging: This can be done individually. We are able to log the connections and separately to send this log entry to a remote Syslog server.
VPN-Wizard
Another interesting point here is the VPN-Wizard which looks very comfortable to set up new VPN-Connections between sides.
Let us have a quick look at it. The first step within the wizard looks very easy. You can fill up all the fields and then by clicking ‚NEXT‘ you will be redirected to the second step.
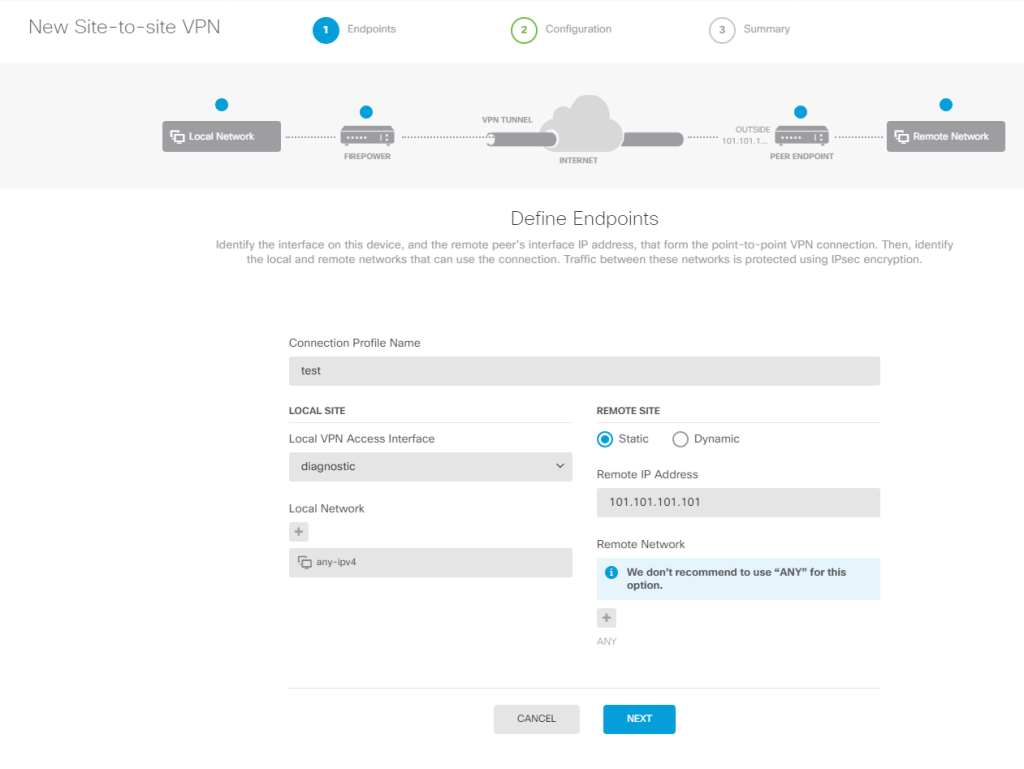
By default is IKEv2 activated. Based on what I could see from the wizard, Diffie Hellman Groups higher than 5 are only available in IKEv2.

By clicking on next we will see the summary of all the details of this VPN-Connection.
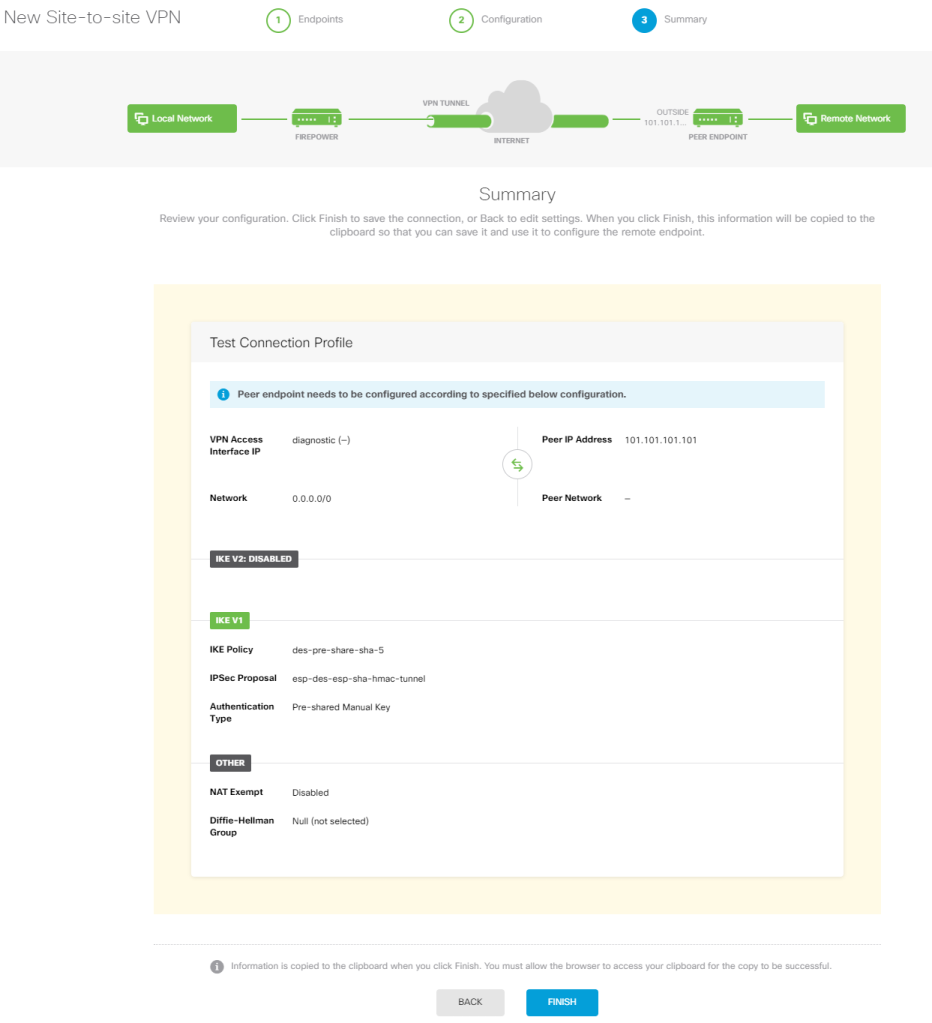
On the bottom of the window this funny message appears.
Information is copied to the clipboard when you click Finish. You must allow the browser to access your clipboard for the copy to be successful.
The information copied is very useful. Here an output from my notepad.
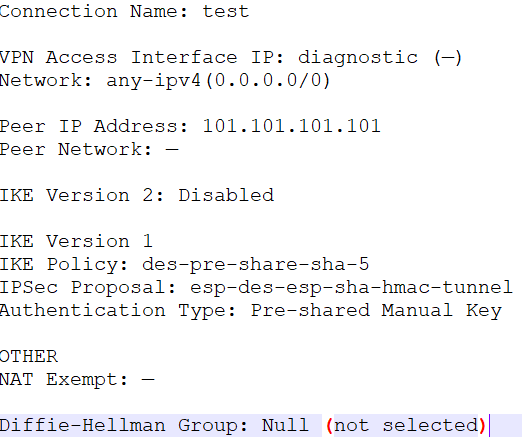
At this precise time, I did not find out how to check the current status of the VPN-Connections. Therefore I was not able to troubleshoot whether or not the connection was working properly. It’s also hard to say if I could troubleshoot in case the proposal on the opposite site was misconfigured or not.
Backup
We have now the possibility to run backup jobs. For this task, FDM offers us the following actions.
- Recurring Backup: You can choose to perform a backup of the Firepower on a daily, weekly, or monthly basis at a specific time of the day.
- Scheduled Backup: The job will run at a specific date and time.
- Manual Backup: This will perform an immediately backup job.
- Upload
To perform a backup of the device it will take a while, so do not panic if nothing happens for about 10 minutes. While this time, you won’t be able to make any changes in the configuration.
Once the backup ran it will be displayed in the list below the task

From the backup list, we can select to restore, download, or delete the backup file. Downloading the file gives you the opportunity to save the backup externally and upload it later in case you wipe the box completely.
It requires to have the same version, including build number, and the same device model.
Cisco says that the backup file only contains the configuration of the device and not its software. Having a closer look at the file backup manually (See image above) the backup was 36 MB, compared to a common backup on an ASA-5506-X containing maybe 100 Kb it’s a lot more.
Monitoring
The graphics and information offered by the monitoring
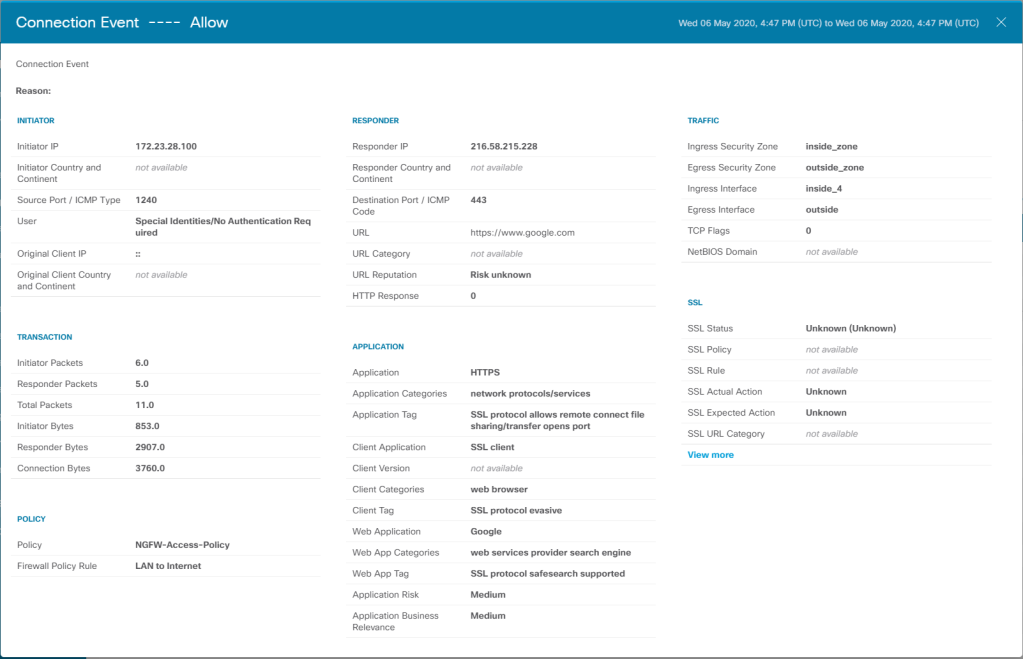
Logging
By navigation to the Monitoring section, you will be able to access to the event logs. There you can click on ‚view details‘ in order to find out more information about it. The information provided by the Firepower is very detailed and lets us understand what had happened during the connection.
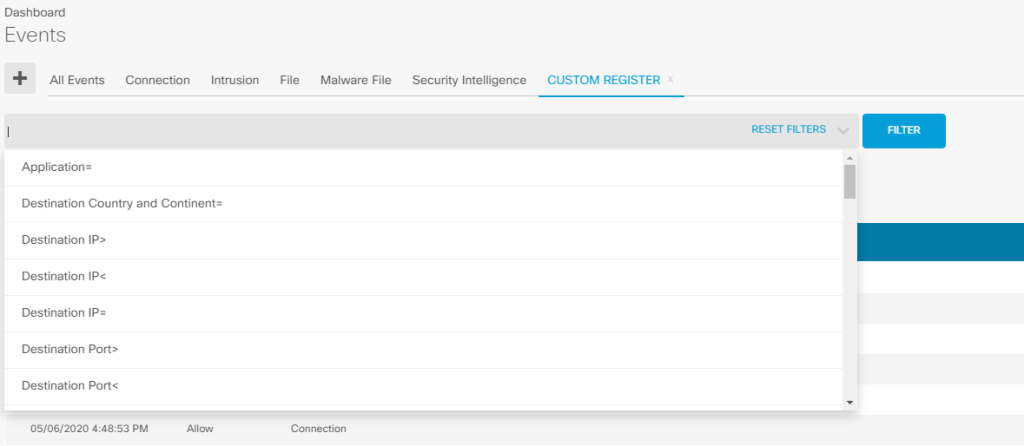
We have also the possibility to create a custom register-based on very specific conditions in order to accurately find the events we are looking for.
Conclusion
At some point, while writing this post I’ve realized that it does not makes sense to do further tests on this device, since this product did not achieve not even the minimal expectations I had.
The intial setup was very easy, I went through it without big problems.
Once connected to the FDM, even if all the menus are available in front of you, the dashboard is something to needs getting used to. It is definitely not very intuitive.
The first time I deployed the new configuration and it took about 3 minutes I was a bit surprised and shocked. This is something you have to understand and accept. You cannot change it!
Regarding the fact, that some functions are only available when the device is being managed by the FMC is very sad. The fact that the FMC needs a minimum of 28 GB RAM to run (32 Suggested) is very sad. The price for such an infrastructure to have a redundant FMC to administer one Firepower 1010 would double the price of the device itself.
I’ve read on some forums that the FMC is compared with ASDM. There is NO comparison between them. An ASDM instance can be run locally on a windows machine with fewer resources than an FMC.
I will install the FMC anyway in order to make some interesting posts about further functions the Firepower offers.
It is also very important to mention that without FMC you won’t be able to run your box in transparent mode.
Running the Firepower with the local manager will also impede us to block specific file extensions like *.exe, *.msi, *.jpg, *.txt. You can simply block files based on pre-defined profiles. You are not able to add and customize one by yourself.
As additional information, when setting it up into transparent mode and the back to route mode or viceversa the rules looks different than on the initial setup.
I’ve found the VPN-Section with wizard very comfortable, but having a closer look at it, I could not find any section to troubleshoot the state of the VPN-Connection. How do I check if traffic is passing by or not?
The options provided by the FDM are not limited, but due to the fact of the missing flexibility within the policies, it limits you to a determined behavior of the box, without the possibility to adapt it to your specific needs.
Last but not least…
The Firepower is finally a dignified rival for other Next-Gen Firewall vendors, but ONLY if it is managed by FMC. However, there are better options on the market for small business, whit little requirements than an enterprise.
As a Cisco fan, I only hope that the FDM will offer more features in the future…
I may not miss the opportuity to mention that my girlfriend meant that the device is working as a heat dispenser.
Hopefully this review was helpful for you…
See you on my next post.
